You are browsing the archive for Easter craft.

Easter Tissue Cross Craft

April 9, 2017 in Creative Adventures, God - Faith - Hope - Love


Updated Easter Paper Plate,Tissue Paper Cross: Draw a cross on the eating side of your plate, then cut little shapes with your exacto knife. Glue small pieces of tissue paper and add curling ribbon to the bottom of your plate. For further instructions see directions below. Happy Easter!


We are going to an old folks home tomorrow so I pulled together a craft for the  kids at church to make that will be used to decorate for our visit. Our friends love anything we do for them, love our visits and are always very appreciative. So sad to be lonely.

Make a pattern for cross.


1. Make a pattern for the cross by folding a piece of paper in half and cutting it as shown in the picture.

Trace pattern to plate

2. Trace cross pattern to the inside near the top of your paper plate, you will be adding words to the bottom. After you cut out your first cross use it as your pattern now, it is easier to handle.

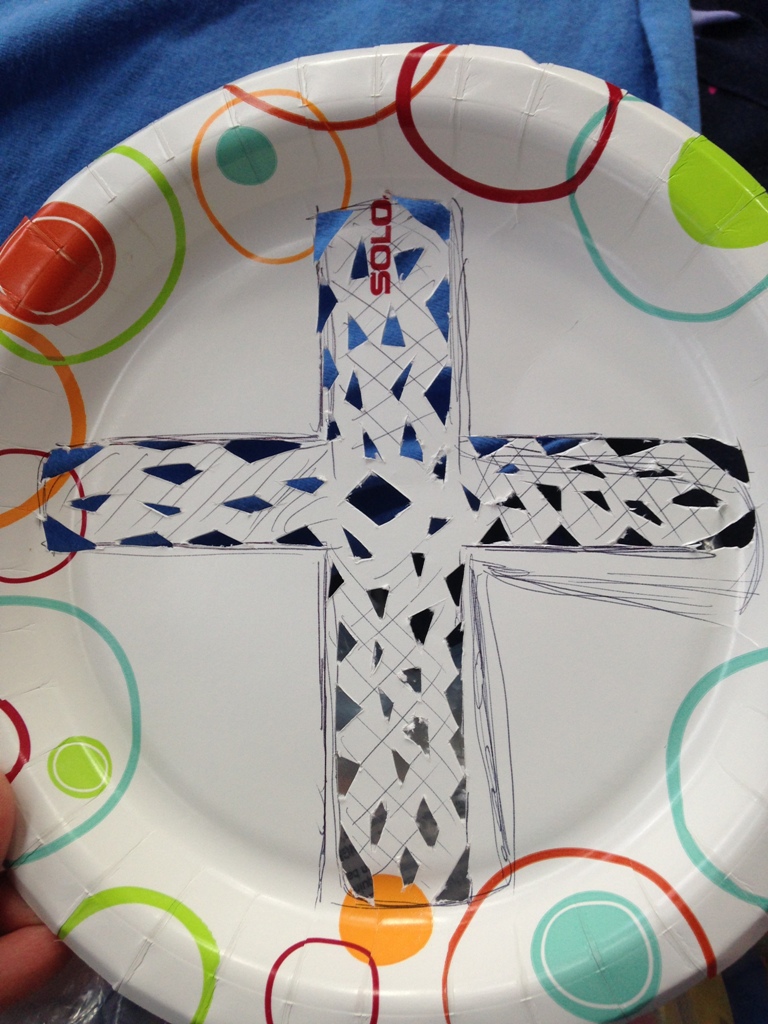
Adult cuts cross with small razor.

Remove cross cut out.

Cross cut out.

3. Cut with a small razor knife, this of course is done by an adult. I prep all of the parts of the project so the kids only need to glue, color and tie a string. Now flip your plate over to the eating side to get ready for tissue paper.

Cut tissue in 1×3 inch strips.


4. Cut tissue paper in 1 x 3 inch strips. Cut various colors, I chose, pink, purple and sparkle white.

Glue tissue across opening.


5. Glue tissue strips across cross opening. Glue in different angles overlapping a bit each time to create a stain glass look. Add more glue as needed to make edges stick.

6. Final touches:  Add a greeting, I said Happy Easter and added a flower graphic to each side which I found on the web. I made several copies of my greeting in a word doc. and cut them in strips with a paper cutter. You might also find a nice one in sticker form. I drew a little grass at the bottom of the cross, green makes things look like they belong. I  added a small sun made from yellow tissue paper, colored the edges with purple, pink and green, punched two holes and added a string.

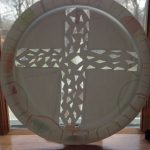
You can hang your Easter plate in a window which will catch the light nicely or you can hang it on a wall, cabinet knob or wherever you like.

Tissue Easter cross on wall.

Light shines through Easter plate.


Hope you have a blessed Resurrection Easter Sunday. Thank God for His awesome love.  Easter wouldn’t be Easter without all that Jesus has done.  Have a great day with family and friends, enjoy the warmer weather and be healthy.

Dawn

You may like:   Spring Tissue Paper Vase

Spring Tissue Paper Vase

March 24, 2012 in Creative Adventures

Sterile Water Bottle Tissue Paper Vase


Over the years while working with my little SMA 1 patient (he’s 5 now) we have made some fun crafts from items that would otherwise be thrown in the recycle bin or thrown away. I love looking around and seeing what can be made of these insignificant items that were very important when they were being used for there intended purpose.  My little friend is on a bipap/vent continuously as part of his treatment to sustain his life. Wow, that was painful to say. He needs moisture in his vent tubing to prevent nose bleeds and a dry mouth as you can imagine air is blowing through his nostrils nonstop (we also apply ayr, a saline moisturizer to each nostril for the same purpose).

Our tissue paper vase today is made from one of his sterile water bottles, the sterile water goes in his humidifier that is connected to his bipap/vent, he uses about 2 liters in a 24 hr period.


Sterile H20 Bottle and Tissue


Pick any color tissue paper you like and rip into small manageable pieces. Remember to let the kids do the ripping, they love to experience the cause and effect of the process, feeling and hearing the paper rip is stimulating to the senses. If you are in the home care setting you may have to do hand over hand as I did with my patient.


Add Tissue Paper with Glue


Place a towel over your child’s lap or cover the work area with wax paper (helps it not stick later). Apply the tissue paper to the bottle with liquid glue, you may need to thin it a little with a few drips of water so it is easier to work with. Add layers to the bottle and vary the colors, remembering not to add too many layers because the sun will shine through your vase which gives it a stain glass effect. Again, let the children feel the slimy glue, this is one of the components that makes creating art therapeutic and fun. Adults need to apply a coat of some sort of clear acrylic or it will be sticky each time you get it wet.


Add a Bow to Tissue Paper Vase


After the glue is dry add a bow, pick some flower and you are good to go. Easter is coming and the flowers are blooming, what mom, grandmother, aunt or sister would not appreciate such a special gift created by your child’s hands.


I have added some links below that I thought you might enjoys.

Meet my SMA1 Patient Kian      Kian’s Tribute to Dad      Kian’s Tribute to Mom     

Candy Wrapper Recycle Craft     Pipe Cleaner Paint Craft     Easter Tissue Cross Craft

Don’t forget to subscribe so you won’t miss any of our posts about:

*Tools for teaching kids about healthy living…

*Recycling craft ideas…

*My thoughts on life, family and friends…

Have a Wonderful Spring and Happy Easter!

Dawn